Cozy Boston Cream Pie Recipe: Better Than Takeout
Indulge in the cozy comfort of homemade Boston Cream Pie. This classic American dessert is better than takeout and perfect for any occasion. After making this many times, I’ve discovered the trick to a perfectly moist cake every time. Keep reading for my best tips. If you love recipes like this, you’ll also enjoy Easy Crock Pot Crack Chicken Recipe for Busy Weeknights and Slow Cooker Cajun Butter Chicken with Creamy Sauce.
Why This Cozy Boston Cream Pie Recipe: Better Than Takeout Is Pure Comfort
- Moist, tender yellow cake
- Rich, creamy vanilla custard
- Decadent chocolate glaze
- Easy to make, better than takeout
What You'll Need for Cozy Boston Cream Pie Recipe: Better Than Takeout
Choosing the right ingredients makes a big difference, but this recipe is forgiving enough to work with what you have.
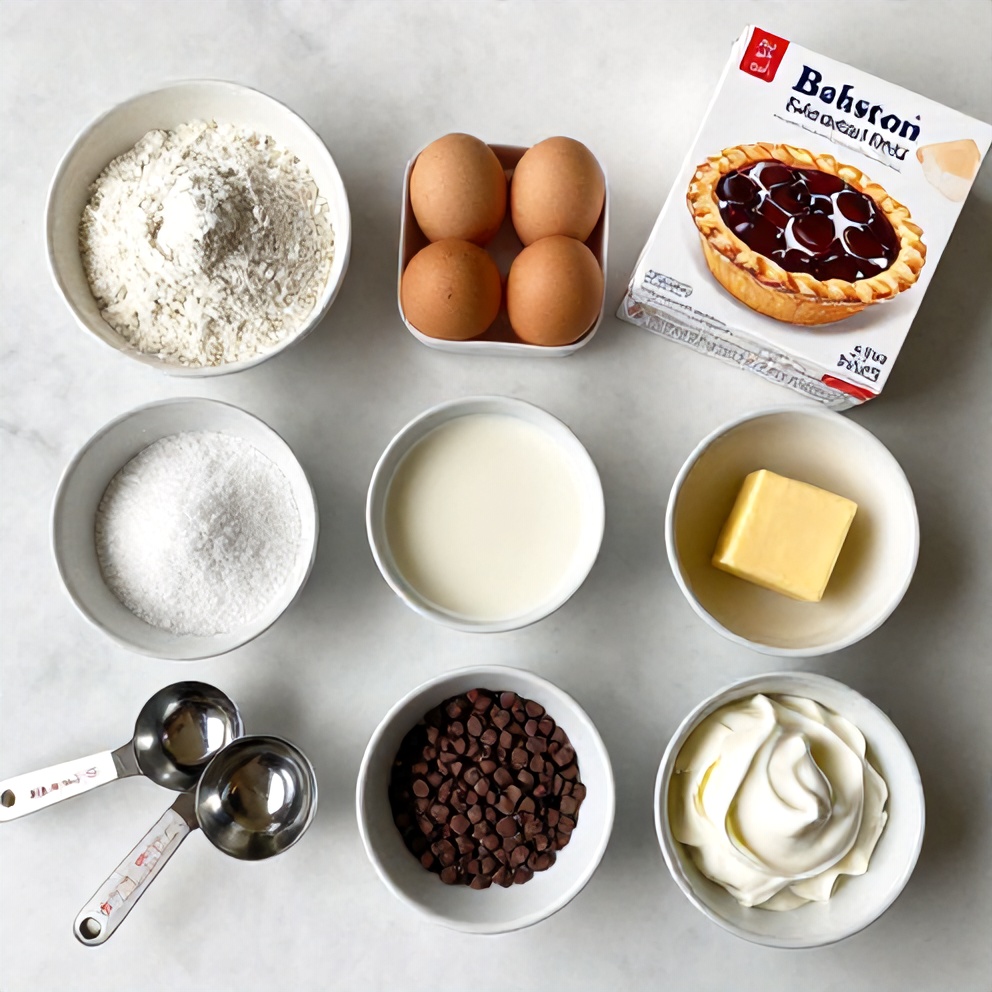
- Yellow cake mix
- Eggs
- Milk
- Vanilla extract
- Sugar
- Unsalted butter
- Semisweet chocolate
- Heavy cream
- Vanilla extract
- Chocolate
- Sugar
- Optional: Powdered sugar for dusting
- Optional: Fresh berries for serving
📝 Ingredient Notes
- Yellow cake mix: Ensure it's a 15.25 oz box.
🛒 Tools & Equipment I Recommend
- Stand mixer — Ensures a smooth, lump-free batter. Pays for itself vs takeout. → See on Amazon
- Silicone baking mat — Prevents the cake from sticking and ensures even baking. A must-have for perfect cakes. → See on Amazon
How to Make Cozy Boston Cream Pie Recipe: Better Than Takeout
- Prepare the cake: Preheat oven to 350°F (175°C). Grease and flour two 9-inch round cake pans. In a large bowl, combine cake mix, 3 eggs, 1 cup milk, and 1/3 cup oil. Beat until smooth. Divide batter between pans. Bake for 20-25 minutes or until a toothpick inserted comes out clean.
- Make the custard: In a saucepan, whisk together 2 cups milk, 3/4 cup sugar, and 1/4 cup cornstarch. Cook over medium heat until thickened. In a separate bowl, beat 4 egg yolks. Slowly pour hot milk mixture into yolks, whisking constantly. Return to saucepan and cook over low heat until thickened. Remove from heat and stir in 1 teaspoon vanilla. Let cool.
- Make the glaze: In a microwave-safe bowl, heat 1 cup semisweet chocolate chips and 1/2 cup heavy cream in 30-second intervals until smooth. Let cool slightly.
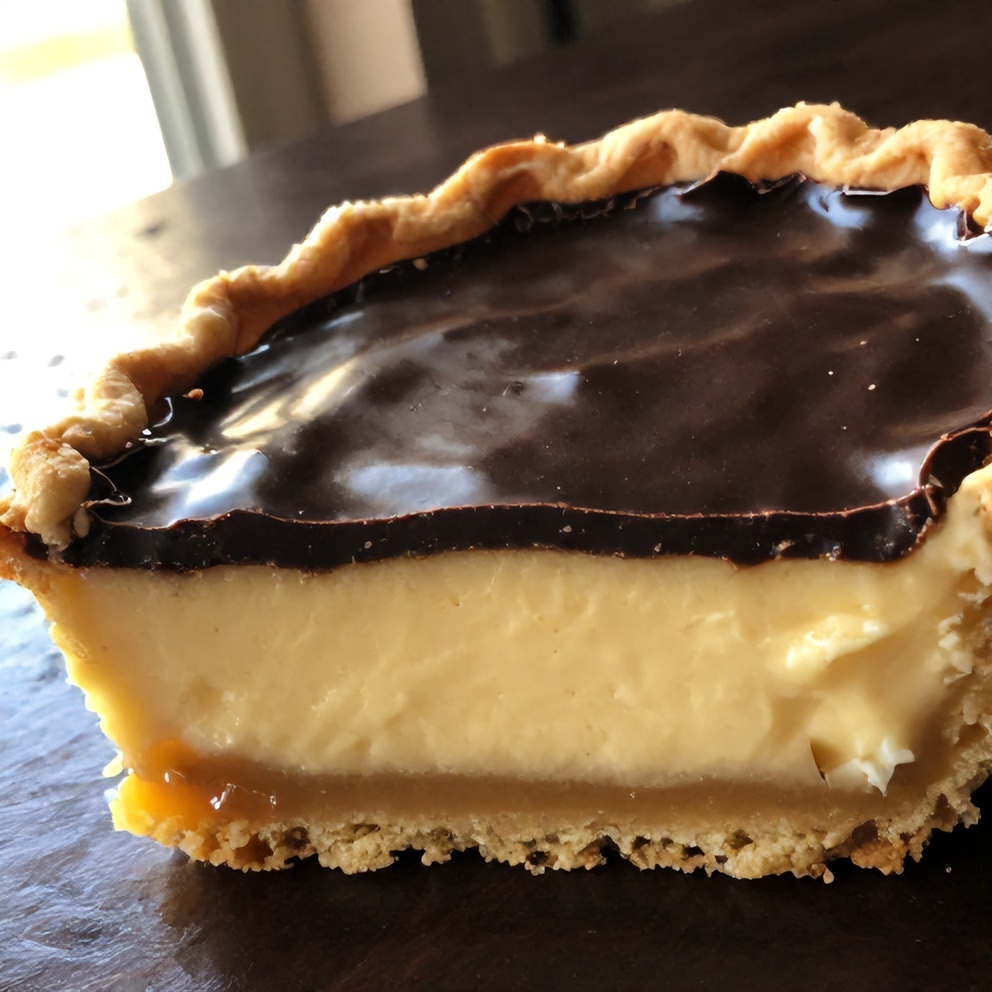
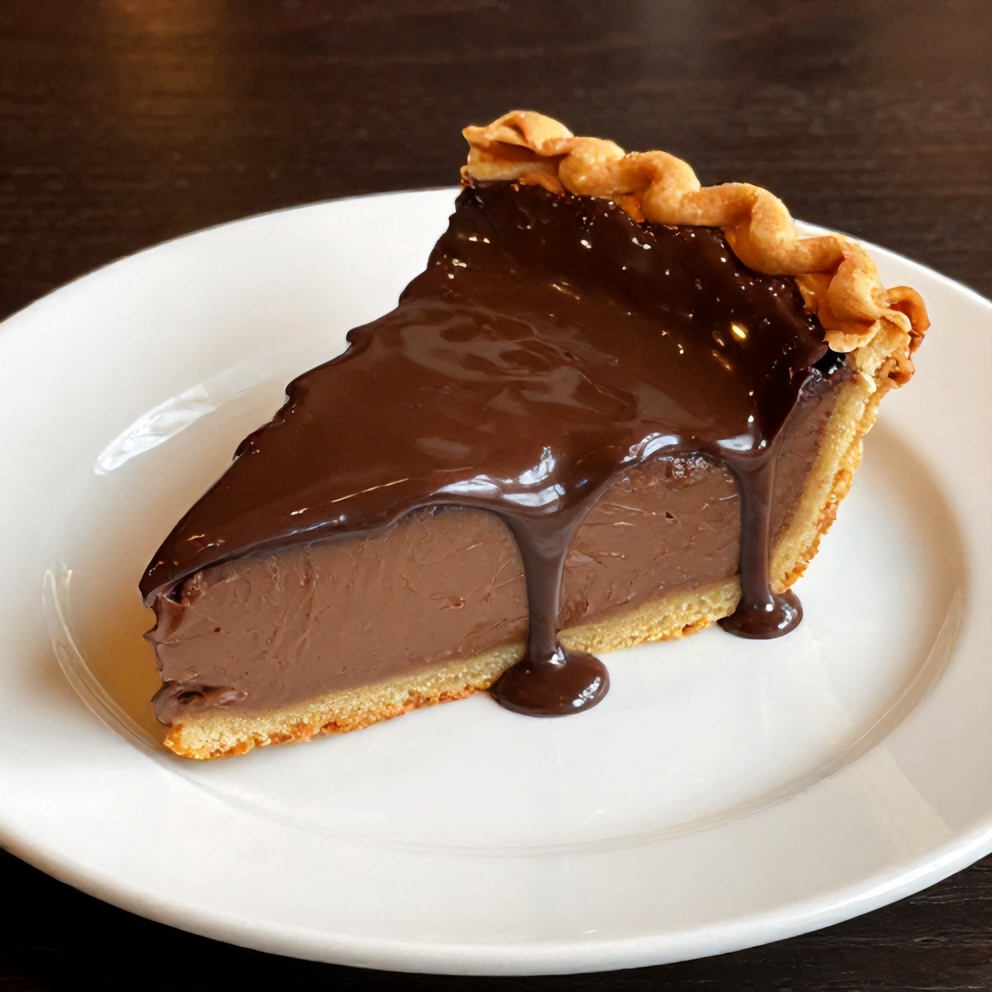
- Assemble the pie: Once cake and custard are cool, place one cake layer on a serving plate. Spread custard over cake. Place second cake layer on top. Pour chocolate glaze over cake, allowing it to drip down the sides. Let set before serving.
Cook's Tips for Perfect Cozy Boston Cream Pie Recipe: Better Than Takeout
- Common mistake and fix: Don't overbake the cake. Check it at 20 minutes to prevent dryness. If it's not done, cover the top with foil to prevent over-browning.
- Pro tip: For a lighter, fluffier cake, separate the eggs and beat the whites until stiff before folding them into the batter.
- Pro tip: To prevent the cake from sticking, grease and flour the pans, then line the bottom with parchment paper.
- Pro tip: For a smooth, shiny glaze, use high-quality chocolate chips and let the glaze cool slightly before pouring.
Storing & Reheating Cozy Boston Cream Pie Recipe: Better Than Takeout
Short-Term Storage
Store in an airtight container in the fridge. Store in the fridge for up to 5 days. Make-ahead tip: The cake and custard can be made a day ahead. Assemble just before serving.
Freezing Cozy Boston Cream Pie Recipe: Better Than Takeout
Freeze the unglazed cake layers for up to 3 months.
How to Reheat Without Drying It Out
Oven: No need to reheat. Serve chilled or at room temperature. Microwave: Not recommended. Microwaving can make the cake soggy.
Recipe Notes
- Chef tip: For a show-stopping presentation, dust the top of the pie with powdered sugar and garnish with fresh berries.
- Best substitution: For a dairy-free version, use almond milk and dairy-free chocolate chips.
- Make-ahead: The cake and custard can be made a day ahead. Assemble just before serving.
- Scaling: This recipe can be easily doubled to serve a crowd.
- Troubleshooting: If the custard is lumpy, strain it through a fine-mesh sieve before using.
Want to level up this recipe?
High-quality chocolate chips — Ensure a smooth, shiny glaze. A small investment for a big impact. → Check price on Amazon
Cozy Boston Cream Pie Recipe: Better Than Takeout
Ingredients
Main Ingredients
- Yellow cake mix
- Eggs
- Milk
- Vanilla extract
- Sugar
- Unsalted butter
- Semisweet chocolate
- Heavy cream
Seasonings
- Vanilla extract
- Chocolate
- Sugar
Optional Toppings
- Powdered sugar for dusting
- Fresh berries for serving
Instructions
- Prepare the cake: Preheat oven to 350°F (175°C). Grease and flour two 9-inch round cake pans. In a large bowl, combine cake mix, 3 eggs, 1 cup milk, and 1/3 cup oil. Beat until smooth. Divide batter between pans. Bake for 20-25 minutes or until a toothpick inserted comes out clean.
- Make the custard: In a saucepan, whisk together 2 cups milk, 3/4 cup sugar, and 1/4 cup cornstarch. Cook over medium heat until thickened. In a separate bowl, beat 4 egg yolks. Slowly pour hot milk mixture into yolks, whisking constantly. Return to saucepan and cook over low heat until thickened. Remove from heat and stir in 1 teaspoon vanilla. Let cool.
- Make the glaze: In a microwave-safe bowl, heat 1 cup semisweet chocolate chips and 1/2 cup heavy cream in 30-second intervals until smooth. Let cool slightly.
- Assemble the pie: Once cake and custard are cool, place one cake layer on a serving plate. Spread custard over cake. Place second cake layer on top. Pour chocolate glaze over cake, allowing it to drip down the sides. Let set before serving.
Notes
- Chef tip: For a show-stopping presentation, dust the top of the pie with powdered sugar and garnish with fresh berries.
- Best substitution: For a dairy-free version, use almond milk and dairy-free chocolate chips.
- Make-ahead: The cake and custard can be made a day ahead. Assemble just before serving.
- Scaling: This recipe can be easily doubled to serve a crowd.
- Troubleshooting: If the custard is lumpy, strain it through a fine-mesh sieve before using.
Storage
- Fridge: Store in the fridge for up to 5 days.
- Freezer: Freeze the unglazed cake layers for up to 3 months.
- Oven reheat: No need to reheat. Serve chilled or at room temperature.
- Microwave reheat: Not recommended. Microwaving can make the cake soggy.
- Make ahead: The cake and custard can be made a day ahead. Assemble just before serving.
Nutrition Per Serving
- Calories: 450
- Protein: 6g
- Fat: 20g
- Carbs: 60g
- Fiber: 1g
- Sugar: 35g
- Sodium: 250mg
- Cholesterol: 120mg
- Sat. Fat: 12g
Nutritional values are estimates only. Actual values may vary by brand and portion size.
Cozy Boston Cream Pie Recipe: Better Than Takeout FAQs
Yes, the cake and custard can be made a day ahead. Assemble just before serving to prevent the cake from becoming soggy.
Overbaking is the most common reason for a dry cake. Check it at 20 minutes and cover the top with foil if needed to prevent over-browning.
Yes, you can freeze the unglazed cake layers for up to 3 months. Thaw in the fridge overnight before assembling.
No, this recipe is not suitable for the air fryer. It's best made in the oven.
A homemade yellow cake recipe can be used as a substitute. Ensure it's a similar consistency and baking time.
A Warm Final Note
I can’t wait for you to try Cozy Boston Cream Pie Recipe: Better Than Takeout and see how effortlessly it comes together. When you make it, pop back here and leave a rating or share how it turned out — I love hearing from you!